
How to display family portraits: a 2026 guide
- Jeff Borchert

- 14 hours ago
- 9 min read
TL;DR:
Properly displayed family portraits enhance home decor by following professional standards like the 57-inch eye-level rule. Selecting intimate, high-traffic locations such as hallways or staircases and unifying arrangements with consistent frames ensure lasting visual harmony. Archival glazing, acid-free mats, and quality frames preserve portraits for decades, making meaningful displays both beautiful and durable.
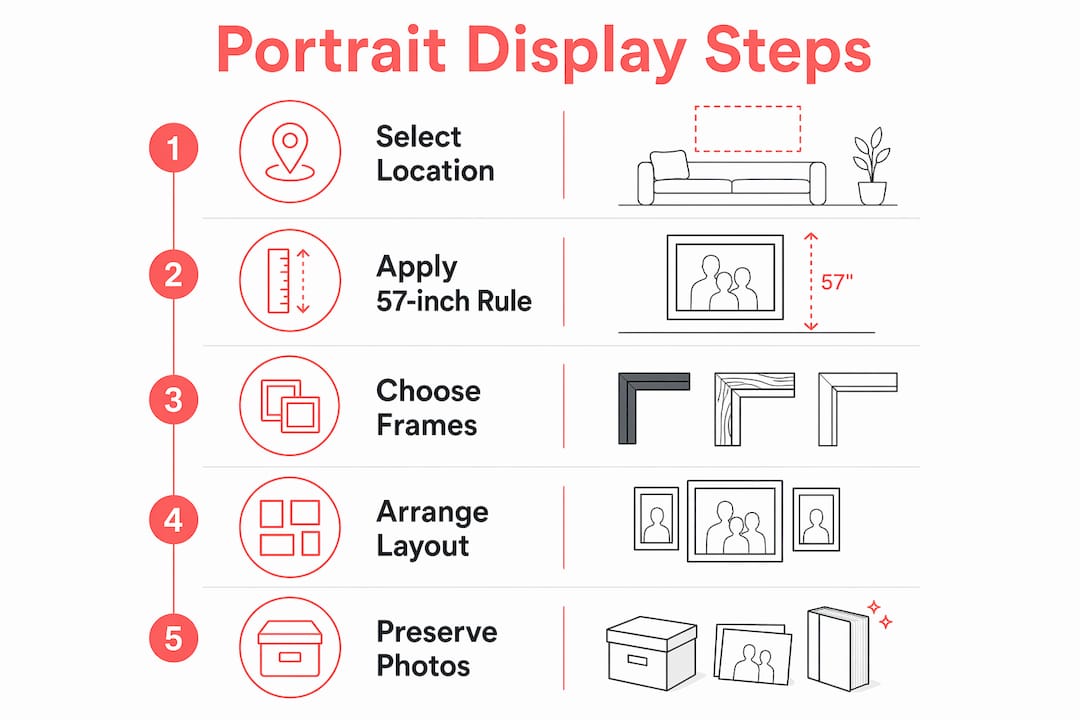
Displaying family portraits is the art of arranging your cherished photographs thoughtfully to enhance your home’s atmosphere and celebrate the people who matter most. Done well, a portrait display transforms a blank wall into a living story. Done poorly, it becomes a cluttered afterthought that nobody really sees. The good news is that professional gallery standards, creative layout techniques, and smart preservation choices make it straightforward to get this right. Whether you’re planning a full gallery wall or simply hanging a single statement piece, this guide covers everything from the 57-inch hanging rule to UV-filtering glazing.
How to display family portraits using professional hanging standards
Getting the placement right is the single biggest factor separating a polished display from one that feels off. Most people hang their portraits too high, and the result is a wall that looks disconnected from the room.
The 57-inch rule and why it matters
The vertical centre of artwork should sit approximately 57 inches from the floor. This is the museum standard, and it aligns the portrait with the average human eye level, making the viewing experience natural and comfortable. A common amateur mistake is anchoring the arrangement to the top of the frame rather than the visual centre, which pushes portraits too high and creates an imbalanced feel.
When you’re hanging a portrait above furniture such as a sofa, console table, or mantel, a different rule applies. Leave 6 to 8 inches between the top of the furniture and the bottom of the frame. This spacing visually anchors the portrait to the furniture below, so the piece looks intentional rather than floating.
Spacing and anchor pieces for gallery arrangements
Here are the core professional standards to follow when arranging multiple portraits together:
Eye-level centre: Keep the visual midpoint of your arrangement at 57 inches from the floor, even when mixing frame sizes.
Consistent frame spacing: Maintain 2 to 3 inches between frames across a gallery wall. This creates cohesion without crowding.
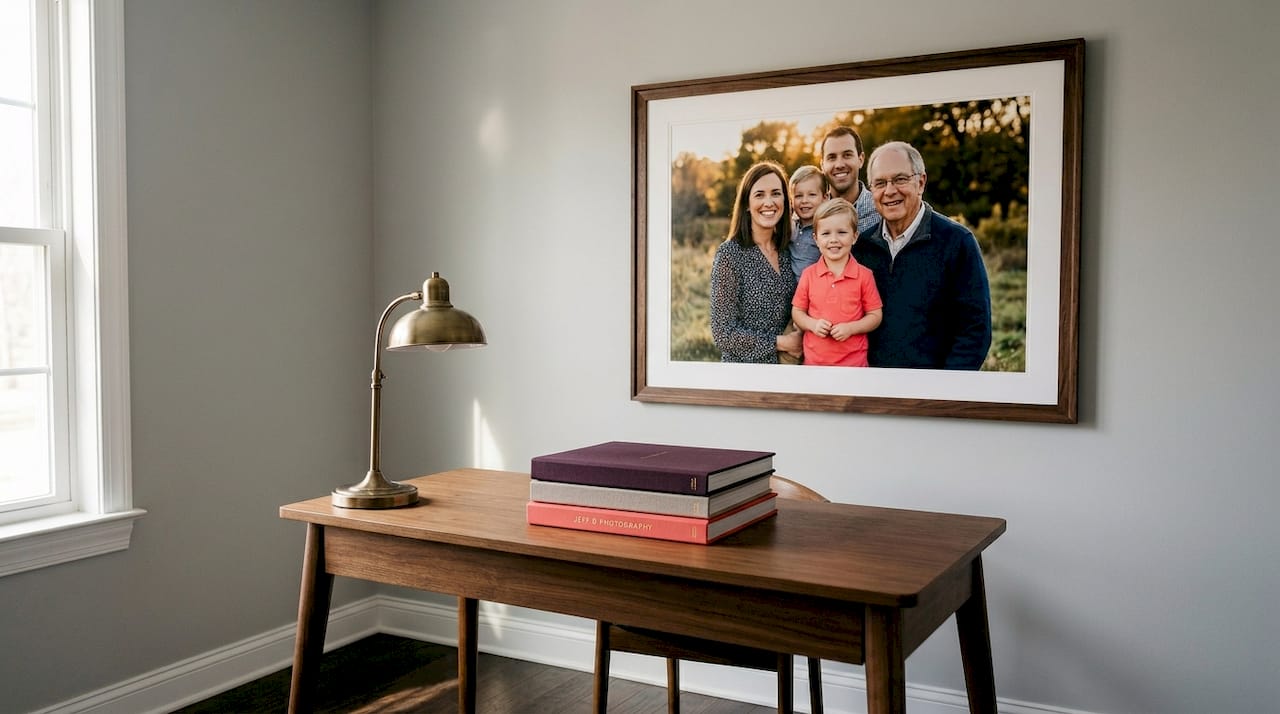
Anchor piece first: Choose your largest or most meaningful portrait as the anchor, hang it first, and build the arrangement outward from there.
Above furniture rule: Keep 6 to 8 inches of breathing room between furniture tops and frame bottoms.
Paper templates: Trace your frames on kraft paper, cut them out, and tape them to the wall before committing a single nail. This saves a lot of patching later.
Pro Tip: Before hanging anything, photograph your paper template layout on the wall. This gives you a reference image to compare against as you add real frames, so you can catch drift early.
Placement scenario | Recommended measurement |
Single portrait, open wall | Centre at 57 inches from floor |
Portrait above sofa or console | 6 to 8 inches above furniture top |
Gallery wall frame spacing | 2 to 3 inches between frames |
Gallery wall coverage | 60 to 75% of wall width |
Where in your home should you hang family portraits?
Location shapes how much your portraits are actually seen and felt. A beautiful print in the wrong room is still a missed opportunity.
Hallways, staircases, bedrooms, and home offices are the preferred locations for family photo displays. These spaces offer intimate, high-traffic viewing without overwhelming formal entertaining areas. A hallway invites a slow look as you pass through. A staircase wall is seen multiple times a day by every person in the house. A home office adds warmth and personal grounding to a work environment.
Formal living rooms and dining rooms are less ideal for dense portrait arrangements. These spaces tend to prioritise design aesthetics, and a large cluster of family photos can feel at odds with a curated interior. One or two meaningful portraits work beautifully in these rooms. A full gallery wall of candid snapshots generally does not.
Bathrooms and kitchens are the rooms to avoid entirely. Humidity and grease accelerate photo degradation, even with quality framing. The kitchen, in particular, exposes prints to airborne oils and temperature fluctuations that no frame can fully protect against.
Pro Tip: Walk through your home at different times of day and note where your eye naturally lands. Those are your best display locations. If a wall already draws your attention, a portrait will feel at home there.
Here is a quick reference for choosing your display location:
Hallways: High traffic, intimate scale, perfect for a sequential or chronological arrangement.
Staircases: Natural upward flow suits a timeline display; viewed daily by the whole family.
Bedrooms: Personal and restful; one or two meaningful portraits work better than a full gallery.
Home offices: Adds warmth and identity to a workspace without distracting from function.
Avoid: Bathrooms, kitchens, and walls with prolonged direct sunlight exposure.
How do you create a gallery wall or timeline display with family portraits?
A gallery wall is not just a collection of frames. It is a curated composition, and the difference between the two is planning.
Choosing your gallery wall style
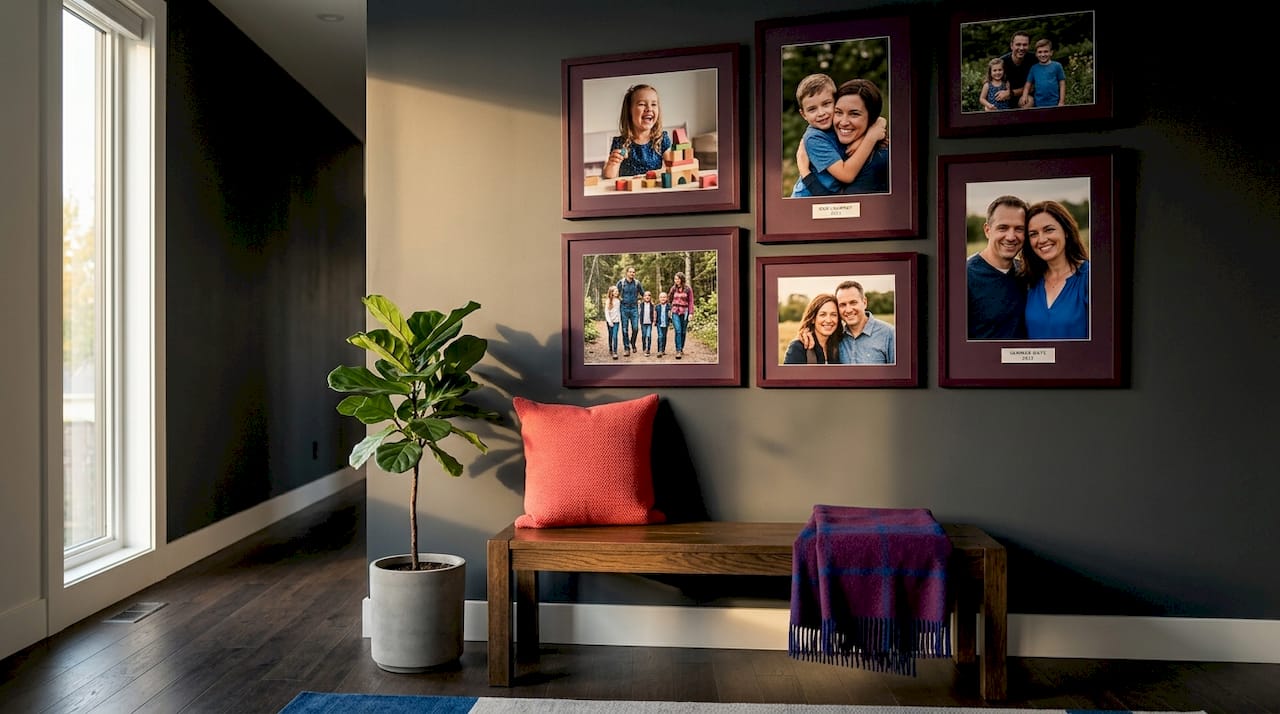
Three main styles suit family portrait displays well. A grid arrangement uses uniform frame sizes in neat rows and columns. It reads as clean and modern, and works especially well with consistent portrait styles such as annual family photos or school pictures. A salon arrangement mixes sizes and orientations in a dense, layered cluster. It feels warm and collected, like something that grew organically over time. An asymmetrical cluster sits between the two: varied sizes with intentional spacing, anchored by one large central piece.
Keeping one frame finish consistent across varied sizes unifies a mixed gallery wall and prevents visual chaos. Black frames, white frames, or natural wood in a single style create harmony even when the portraits themselves vary widely in size, colour, and era. Mixing gold, black, and natural wood in the same arrangement is the fastest way to make a gallery wall feel accidental rather than designed.
Planning your staircase timeline
A staircase is one of the most compelling places to display family portraits because the architecture does half the work for you. Arranging portraits upward from older to newer generations creates a chronological family timeline that matches the natural upward progression of the stairs. You can intersperse milestone events such as weddings, graduations, and new arrivals between the formal portraits to give the timeline texture and personality.
For staircase arrangements specifically, align the centres of your frames along the diagonal of the stair rather than along a horizontal line. This keeps the climbing timeline effect intact without the frames drifting out of visual rhythm as the staircase rises.
Here is a step-by-step approach to planning your gallery wall:
Measure your wall and calculate 60 to 75% of its width as your target footprint. Gallery walls generally cover this range with 8 to 15 frames depending on size.
Choose your gallery style: grid, salon, or asymmetrical cluster.
Select one consistent frame finish across all pieces.
Identify your anchor piece and place it first, centred at 57 inches.
Trace all remaining frames on kraft paper, cut them out, and arrange the templates on the wall with painter’s tape.
Photograph the template layout and adjust before hanging.
Hang frames from the centre outward, checking spacing with a ruler as you go.
Pro Tip: For a cohesive family gallery, limit your portrait selection to images taken within a similar era or with a consistent colour palette. Mixing a warm-toned film portrait from the 1990s with a cool-toned digital print from last year creates visual tension that no frame finish can resolve.
Gallery style | Best suited for | Key characteristic |
Grid | Annual portraits, school photos | Clean, modern, uniform |
Salon | Mixed eras, varied sizes | Warm, layered, collected |
Asymmetrical cluster | Feature wall with anchor piece | Balanced but dynamic |
What materials and methods keep family portraits looking vibrant?
The best display in the world loses its impact if the photos fade within a few years. Preservation starts with framing choices and placement decisions made before a single nail goes in.
UV-filtering glazing can block approximately 99% of harmful radiation, making it the single most effective tool for protecting printed portraits from fading. Standard glass offers almost no UV protection. Museum-grade acrylic glazing, such as Tru Vue Optium, provides UV and abrasion resistance in a lighter-weight format than glass, which matters for larger pieces.
Beyond glazing, here is what to prioritise when framing and placing your portraits:
Archival mats: Use acid-free, lignin-free matboard. Standard cardboard mats off-gas acids that yellow and degrade prints over time.
Quality frames: Solid wood or metal frames hold their shape and seal better than composite frames, reducing humidity infiltration.
Sunlight mapping: Walk through your home at 10 AM, 2 PM, and 4 PM and note which walls receive direct hard sunlight. Avoid those walls for portrait placement, or commit to UV-filtering glazing if the location is otherwise ideal.
Humidity control: Keep portraits away from bathrooms, kitchens, and exterior walls in cold climates where condensation can form behind frames.
Backing boards: Archival foam board backing adds a moisture barrier and keeps the print flat within the frame.
Framing is where many families underinvest. A professional-quality portrait printed on archival paper and placed in a budget composite frame with standard glass will degrade noticeably within five to ten years. The frame is not just decoration. It is the preservation system.
Key takeaways
Displaying family portraits well requires combining professional hanging standards, thoughtful location choices, and archival framing to create displays that look beautiful and last for decades.
Point | Details |
Use the 57-inch rule | Hang portrait centres at 57 inches from the floor to match museum and eye-level standards. |
Choose intimate, high-traffic spaces | Hallways and staircases offer daily viewing without overwhelming formal rooms. |
Unify with one frame finish | Consistent frame colour or material prevents visual chaos across mixed-size arrangements. |
Plan before you hang | Use kraft paper templates and photograph the layout before committing to nails. |
Invest in UV-filtering glazing | Archival glazing blocks up to 99% of UV radiation and is the most effective preservation tool available. |
What I’ve learned from years of photographing and displaying family portraits
Here is something I see constantly: families invest in a beautiful portrait session, receive stunning images, and then store them on a hard drive or print them in a size that ends up tucked behind a door. The display is an afterthought, and that breaks my heart a little.
The images I’m most proud of from my family portrait sessions are the ones I later see on walls. Not on phones. Not in a digital album that gets opened twice a year. On walls, where they become part of the daily texture of a home.
My honest advice is to curate ruthlessly. Curation of family photos into a single gallery reduces clutter and creates a meaningful conversation starter. You do not need twenty frames to tell your family’s story. Five or six exceptional images, well-framed and thoughtfully placed, say far more than a wall covered in every photo you’ve ever taken.
The other thing I’d push back on is the idea that portrait displays need to be permanent. Your family changes. Your home changes. Build your display with that in mind. Use frames that are easy to swap, and revisit the arrangement every couple of years. A display that reflects who your family is right now is always more powerful than one that perfectly captured who you were a decade ago.
— Jeff
Ready to create portraits worth displaying?
The foundation of any great display is a great photograph. At Itsjeffb, family and children’s portrait sessions are designed with the end result in mind: images with personality, warmth, and the kind of connection that looks genuinely beautiful on a wall.
[
Jeff brings the same attention to detail from his commercial work into every family session, so you walk away with portraits you’re genuinely proud to frame and display. Whether you’re building a staircase timeline or a single statement piece for your living room, it starts with the right image. Check out session pricing and options to find the right fit for your family, and take a look at some family photography ideas to start planning your display before the session even happens.
FAQ
What height should family portraits be hung at?
The vertical centre of a portrait should sit at 57 inches from the floor, which aligns with average human eye level and is the standard used in professional galleries. When hanging above furniture, leave 6 to 8 inches between the furniture top and the bottom of the frame.
Where is the best place to display family photos in a home?
Hallways, staircases, and home offices are the best locations for family portrait displays, as they offer intimate, high-traffic viewing without disrupting formal room aesthetics. Avoid bathrooms and kitchens due to humidity and grease exposure.
How many frames should a gallery wall have?
A gallery wall typically covers 60 to 75% of the wall width and includes 8 to 15 frames depending on frame size and wall dimensions. Starting with an anchor piece and building outward keeps the arrangement balanced.
How do I keep family portraits from fading?
Use archival UV-filtering glazing, which blocks approximately 99% of harmful UV radiation, and avoid placing portraits on walls that receive direct hard sunlight during peak hours. Acid-free mats and archival backing boards also significantly extend print life.
What is the easiest way to plan a gallery wall layout?
Trace your frames on kraft paper, cut out the shapes, and arrange them on the wall using painter’s tape before hanging anything. Photograph the template layout and adjust spacing until you’re satisfied, then transfer the arrangement to the wall with nails.
Recommended
Comments